Activate or Setup RCS Business Channel
Wisely allows you to set up the RCS channel via GUI and start communicating with your enterprise users.
Enterprise Admin
Permissions Required:
Admin/ Super Admin
To setup RCS channel, follow the below steps.
Login to Wisely platform using your username and password.
Navigate to Channels --> RCS --> My Agents from the left menu.
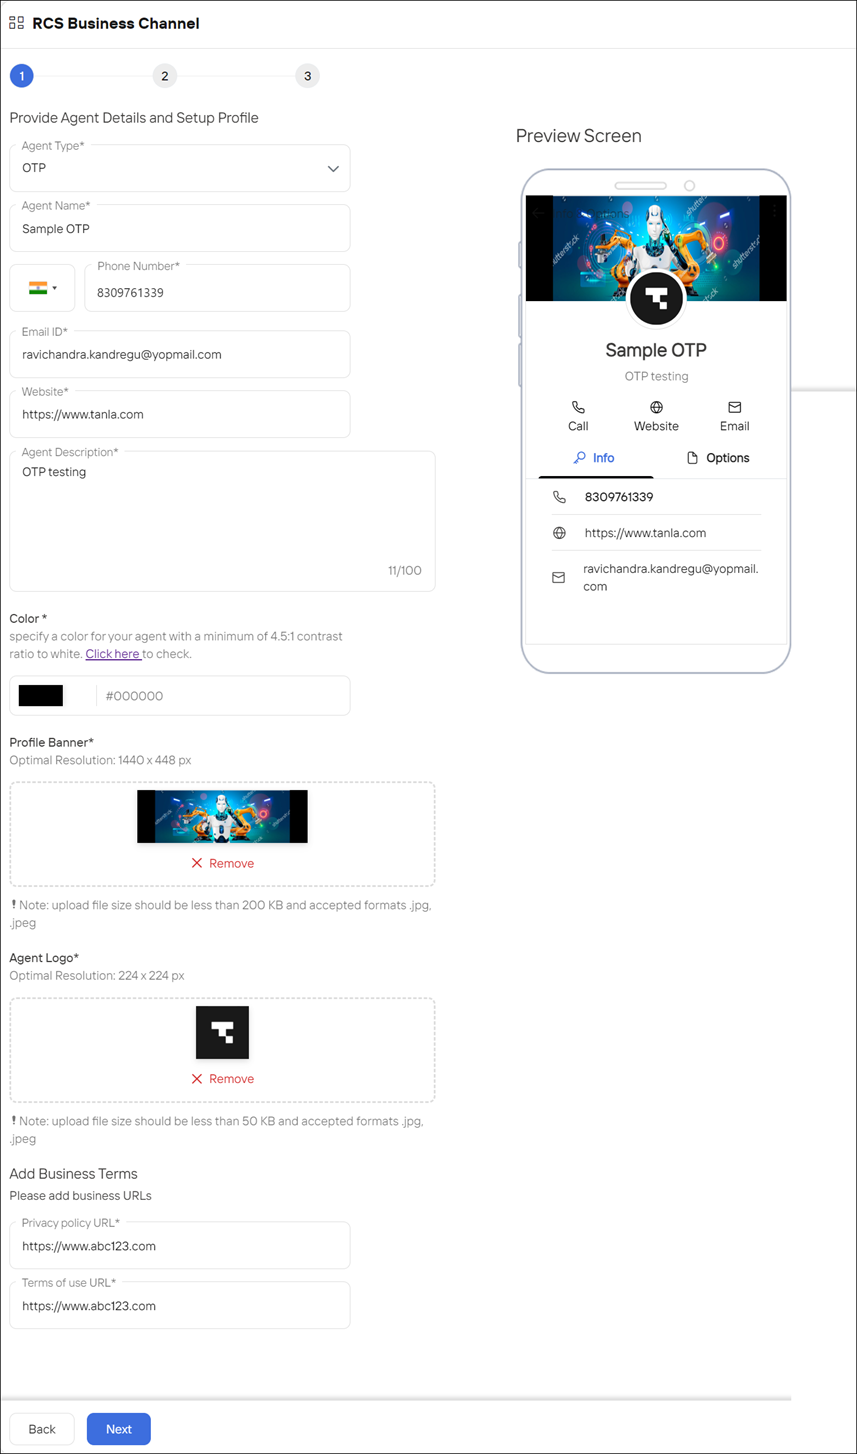
Step 1: Create an agent profile
Click the Add Agent at the top right corner.
Click Get Started.
Complete the following fields.
Field | Description |
|---|---|
Agent Type | Select any type from the dropdown list: |
Agent Name | Maximum 40 characters. Alphabets, Numbers, Spaces, and Hyphen are allowed. |
Phone Number | Enter a phone number with country code. |
Email ID | Enter a valid email address. |
Website | Should start with “https://”. |
Agent Description | Provide a description for the agent. It should have a maximum of 100 characters. |
Color | Select a desirable color. |
Profile Banner | Banner size should be less than 200 KB. Only .jpg or .jpeg formats are allowed. Optimal resolution: 1440 x 448 px. |
Agent Logo | Agent logo should be less than 50 KB. Only .jpg or .jpeg formats are allowed. Optimal resolution: 224 x 224 px. |
Privacy Policy URL | Should start with “https://”. |
Terms of Use URL | Should start with “https://”. |
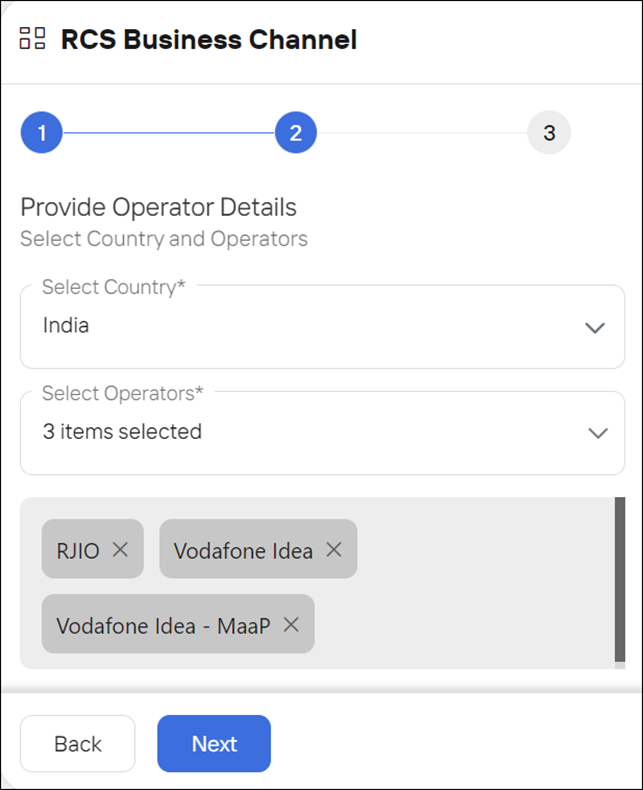
Step 2: Select a Mobile Operator
Select a Country from the dropdown menu.
Select Mobile Operator(s) from the dropdown menu.
Click Next.

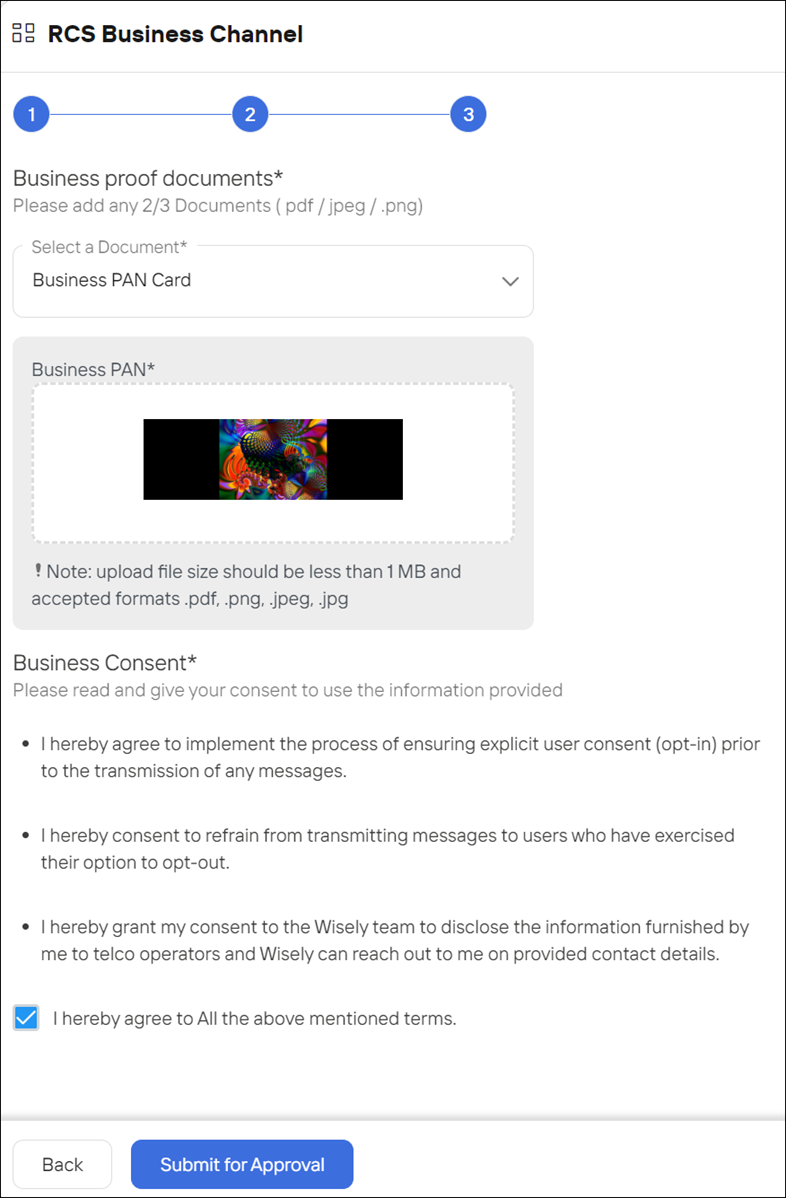
Step 3: Upload Business Proof Documents
Select a business-proof document(s) from the dropdown menu.
Business PAN
GST Document
Certificate of Registration
Note
Upload file size should be less than 1 MB and accepted formats .pdf, .png, .jpeg, .jpg
Checkbox next to “I hereby agree to All the above-mentioned terms.”
Click Submit for Approval.
Once it is approved, it will be moved to Active state and appears in the Agent listing page.
Aggregator Admin
Permissions Required:
Admin/ Super Admin
To set up RCS channel, follow the below steps.
Login to Aggregator platform using your username and password.
Navigate to Channels --> RCS --> My Agents from the left menu.
Step 1: Create an agent profile
Click the Add Agent at the top right corner.
An Add Agent wizard opens.In the Enterprise Name field, select a name from the drop-down menu and click Next.
The setup RCS business channel page opens.Click Get Started.
Complete the following fields.
Field | Description |
|---|---|
Agent Type | Select any type from the dropdown list: OTP, Promotional, or Transactional. |
Agent Name | Maximum 40 characters. Alphabets, Numbers, Spaces, and hyphens are allowed. |
Phone Number | Enter a phone number with the country code. |
Email ID | Enter a valid email address. |
Website | Should start with “https://”. |
Agent Description | Provide a description for the agent. It should have a maximum of 100 characters. |
Color | Select a desirable colour. |
Profile Banner | The banner size should be less than 200 KB. Only .jpg or .jpeg formats are allowed. Optimal resolution: 1440 x 448 px. |
Agent Logo | Agent logo should be less than 50 KB. Only .jpg or .jpeg formats are allowed. Optimal resolution: 224 x 224 px. |
Privacy Policy URL | Should start with “https://”. |
Terms of use URL | Should start with “https://”. |

Step 2: Select a Mobile Operator
Select a Country from the dropdown menu.
Select the Mobile Operator(s) from the dropdown menu.
Click Next.
Step 3: Upload Business Proof Documents
Select a Business Proof Document(s) from the dropdown menu.
Business PAN
GST Document
Certificate of Registration
Note
Upload file size should be less than 1 MB and accepted formats .pdf, .png, .jpeg, .jpg
Checkbox next to “I hereby agree to All the above-mentioned terms.”
Click Submit for Approval.
Once it is approved, it will be moved to Active state and appears in the Agent listing page.
