Overview
What are Business Groups?
Business Groups help you organize users into logical sub-groups within the platform. These groups often reflect structures like departments, teams, projects, or specific user roles.
Benefits of Using Business Groups
The primary benefit is simplified management of access to platform resources. Instead of granting permissions user by user, you can assign access rights to an entire Business Group. For example, you can grant a Business Group access to specific:
Access Accounts/API Keys
SMS - Sender IDs
A Super Admin or Admin within enterprise and aggregator can:
create multiple groups.
Assign users to groups, including:
- Adding many users to one group at a time.
- Assigning one user membership in multiple groups.
Create a Business Group
Authorized Users:
Super Admin/Admin
To create business group(s),
Login to Wisely platform using a valid username and password.
Click Settings on the left menu.
Under the Identity & Access module, click Business Groups.
The business group’s home page opens.Click Add Business Group at the top right corner.
The Add Business Group form opens.In the Business Group Name field, enter a desired name.
In the Business Group Owner field, a group owner name is prefilled by default.
Note
Only one owner is allowed for each business group.
Click Add.
Your business group will be created and enabled in the access account form.

Authorized Users:
Super Admin/Admin
To create business group(s),
Login to the Aggregator platform using a valid username and password.
Click Settings on the left menu.
Under the Users & Permissions module, click Business Groups.
The business group’s home page opens.Click Add Business Group at the top right corner.
The Add Business Group form opens.In the Business Group Name field, enter a desired name.
In the Business Group Owner field, a group owner name is prefilled by default.
Note
Only one owner is allowed for each business group.
(Optional) In Select/de-select Users field, select one or more users from the drop-down menu.
Click Add.
Your business group will be created and enabled in the access account form.
.png)
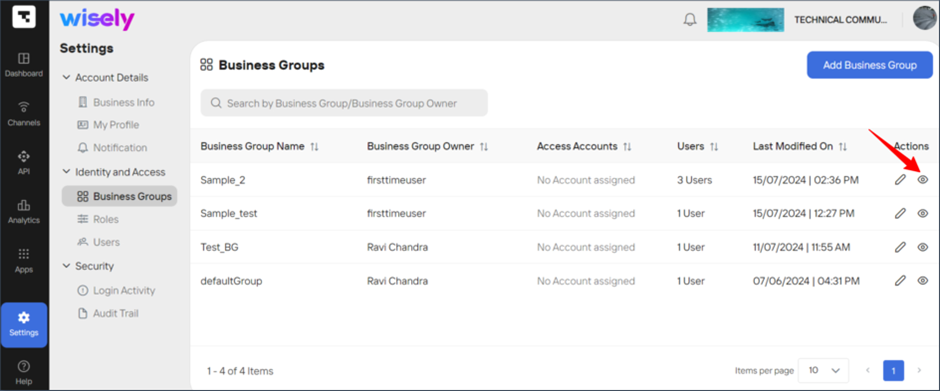
View a Business Group
On the business group home page, view the business group information including name, owner, access accounts assigned, number of users assigned to each group, and last modified.
Authorized Users:
Super Admin
Admin
Developer
Business
To drill down additional details of a business group,
Login to Wisely platform using a valid username and password.
Click Settings on the left menu.
Under Identity & Access module, click Business Groups.
The business group’s home page opens.Click the eye icon (
.png) ) on the far right of the business group.
) on the far right of the business group.
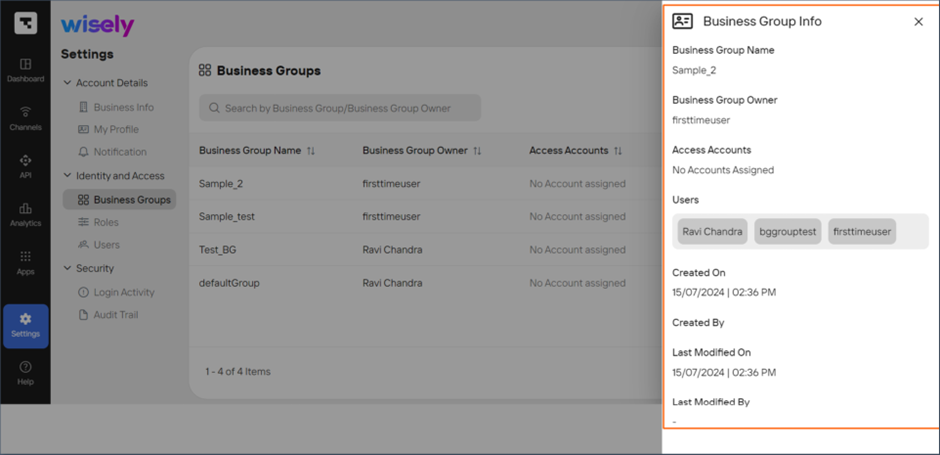
A side menu opens on the right side.View the details and close.
Authorized Users:
Super Admin
Admin
Developer
Business
To drill down additional details of a business group,
Login to the Aggregator platform using a valid username and password.
Click Settings on the left menu.
Under the Users & Permissions module, click Business Groups.
The business group’s home page opens.Click the eye icon (
) on the far right of the business group.
A side menu opens on the right side.View the details and close.
.png)
.png)
Edit a Business Group
Once you have created a business group within the enterprise and aggregator, you can modify the details of a business group if you would prefer to change details including the business group name, owner, and the users assigned to that business group.
Authorized Users:
Super Admin
Admin
Developer
Business
To modify the business group details,
Login to the Wisely platform using a valid username and password.
Click Settings on the left menu.
Under the Identity & Access module, click Business Groups.
The business group’s home page opens.Click the stencil icon (
.png) ) on the far right of the business group.
) on the far right of the business group.
The edit business group form opens.Modify the required details and click Update.
Your changes will be updated.
Authorized Users:
Super Admin
Admin
Developer
Business
To modify the business group details,
Login to the Aggregator platform using a valid username and password.
Click Settings on the left menu.
Under the Users & Permissions module, click Business Groups.
The business group’s home page opens.Click the stencil icon (
) on the far right of the business group.
The edit business group form opens.Modify the required details and click Update.
Your changes will be updated.
.png)