Overview
Campaign Approval Settings help administrators and managers control and manage the approval workflow, ensuring compliance with brand, regulatory requirements, and message content before a campaign is launched.
Key Components of Campaign Approval Settings:
Multi-level and Group-level Approvals: Set a single, multi-level or group level reviewers, for example, legal, marketing, and compliance that ensure the campaign is targeted towards an appropriate audience with the correct message content.
Reviewer Assignment: Assign reviewers like admin or manager or groups including multiple users who have expertise to review the campaign.
Campaign Approval Criteria: The approval criteria include message content, channel types such as WhatsApp, Truecaller, RCS, and SMS, compliance check, and target audience.
Approval Rights: Choose specific reviewers like creator, approver or both to schedule the campaign.
Campaign Expiry: Setup a specific time, for example, 15 mins, 30 mins, or 1 hour, at which the Campaign Manager alerts you before the campaign expiry time, so that it allows the approvers to review the campaign within the specified time, ensuring the campaign is launched before the deadline.
Campaign Manager allows you to setup, edit, view, enable and disable the campaign approval settings at a unified page.
Configure Campaign Approval Settings
Permissions Required:
Admin/Super Admin
To set up the approval settings,
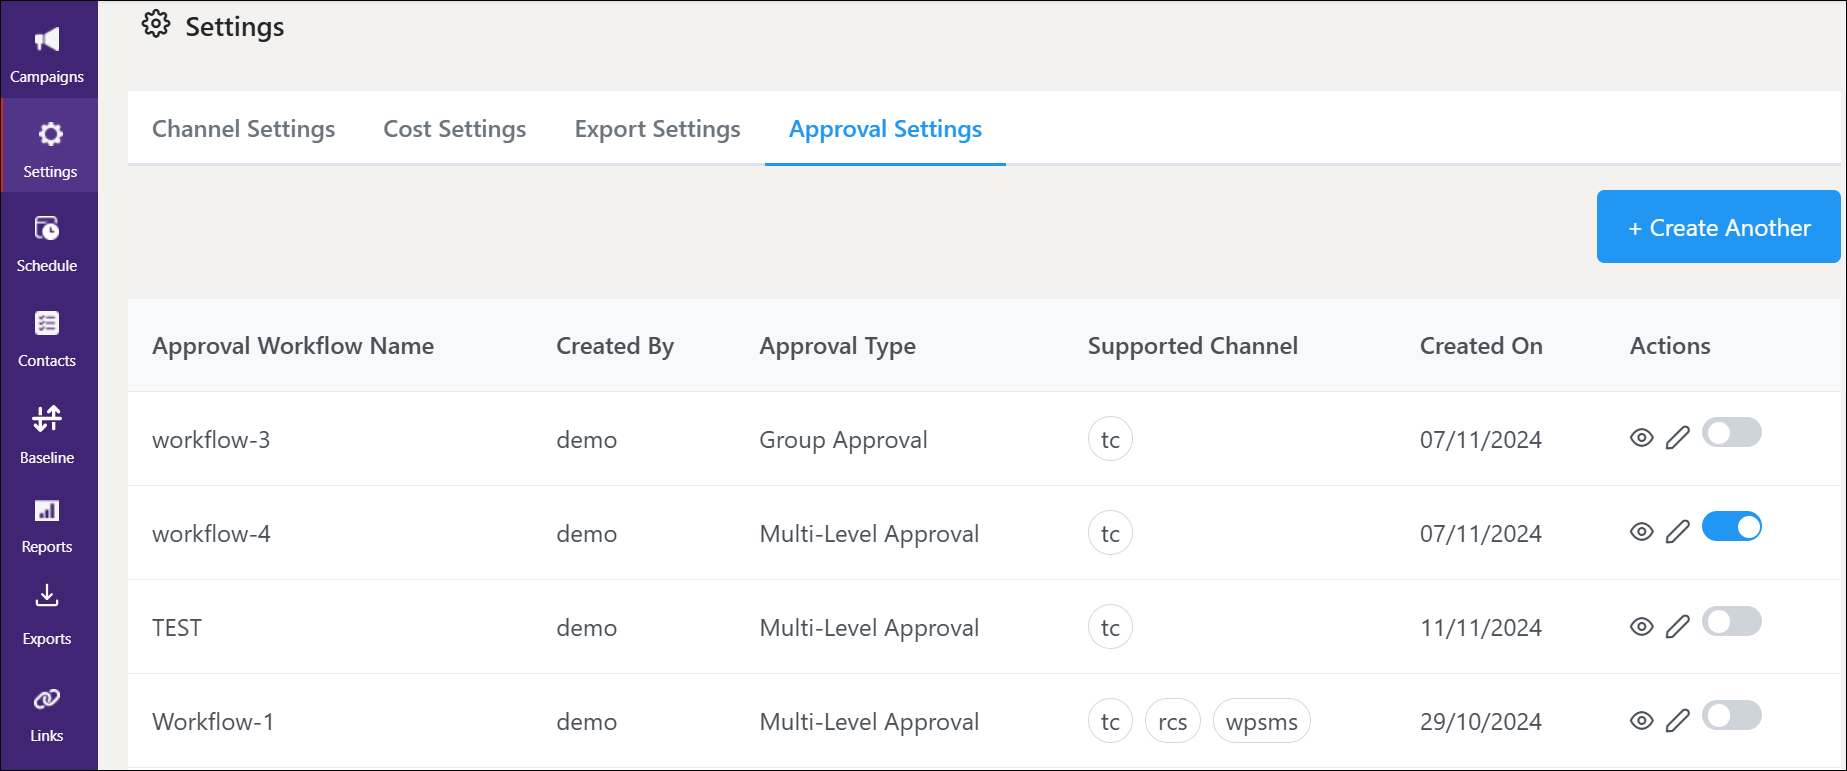
Navigate to Settings --> Approval Settings from the left menu.
Click the +Create Another at the top right corner.
Select the Approval Type next to the below options
I. Multi-level Approval: allows you to choose one or more reviewers to approve the campaign.
II. Group Approval: allows you to choose a group that consists of multiple users such as the admin, and manager who approve the campaign.In the Workflow Name field, enter a name.
Under Channels, select one or more channels that you want to review from the drop-down menu.
Under Campaign Creator, select a role or roles from the drop-down and select the associated Creators based on the roles.
The following fields vary based on the selection of approval type defined in point 3.
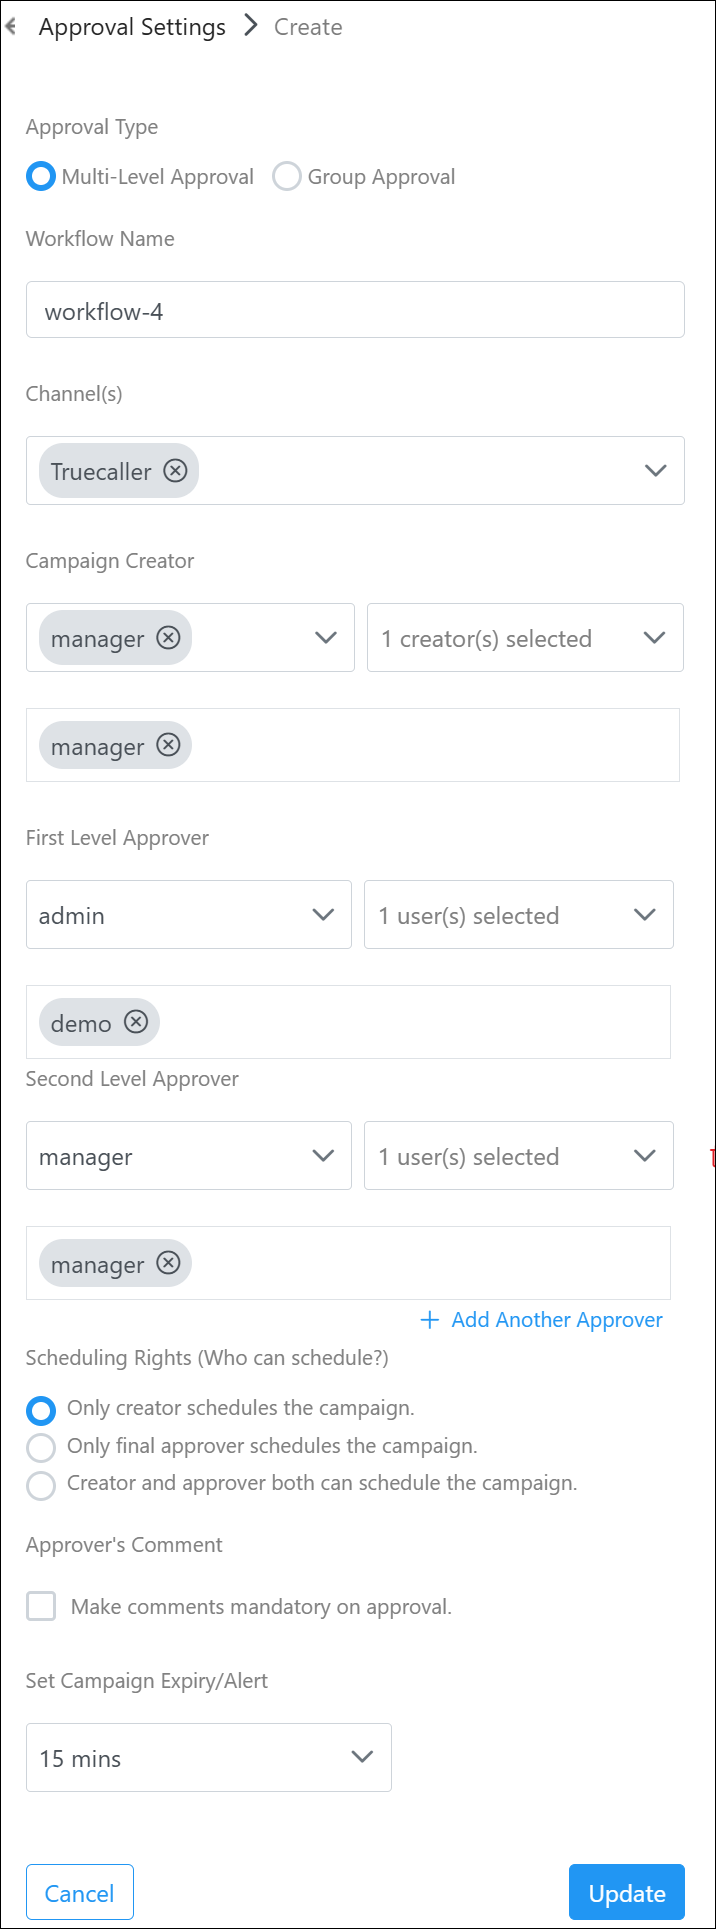
I. For Multi-level Approvals:
a. Under First Level Approver, select a Role and select a User associated with the role.
b. (Optional) Click Add Another Approver and repeat the step a.
c. Under Scheduling Rights, select an option from the following:
Only creator schedules the campaign.
Only final approver schedules the campaign.
Creator and approver both can schedule the campaign.

II. For Group Approvals:
a. Under Approvers, select a role and select a user or users associated with that role.
b. (Optional) Enable the toggle next to Need Approval from everyone from the selected above if you would prefer to include every approver's approval.
c. Under Approvers Count, enter the number of approvers.
d. Under Scheduling Rights, select an option from the following:
Only creator schedules the campaign.
All approvers schedule the campaign.
Creator and approver both can schedule the campaign.
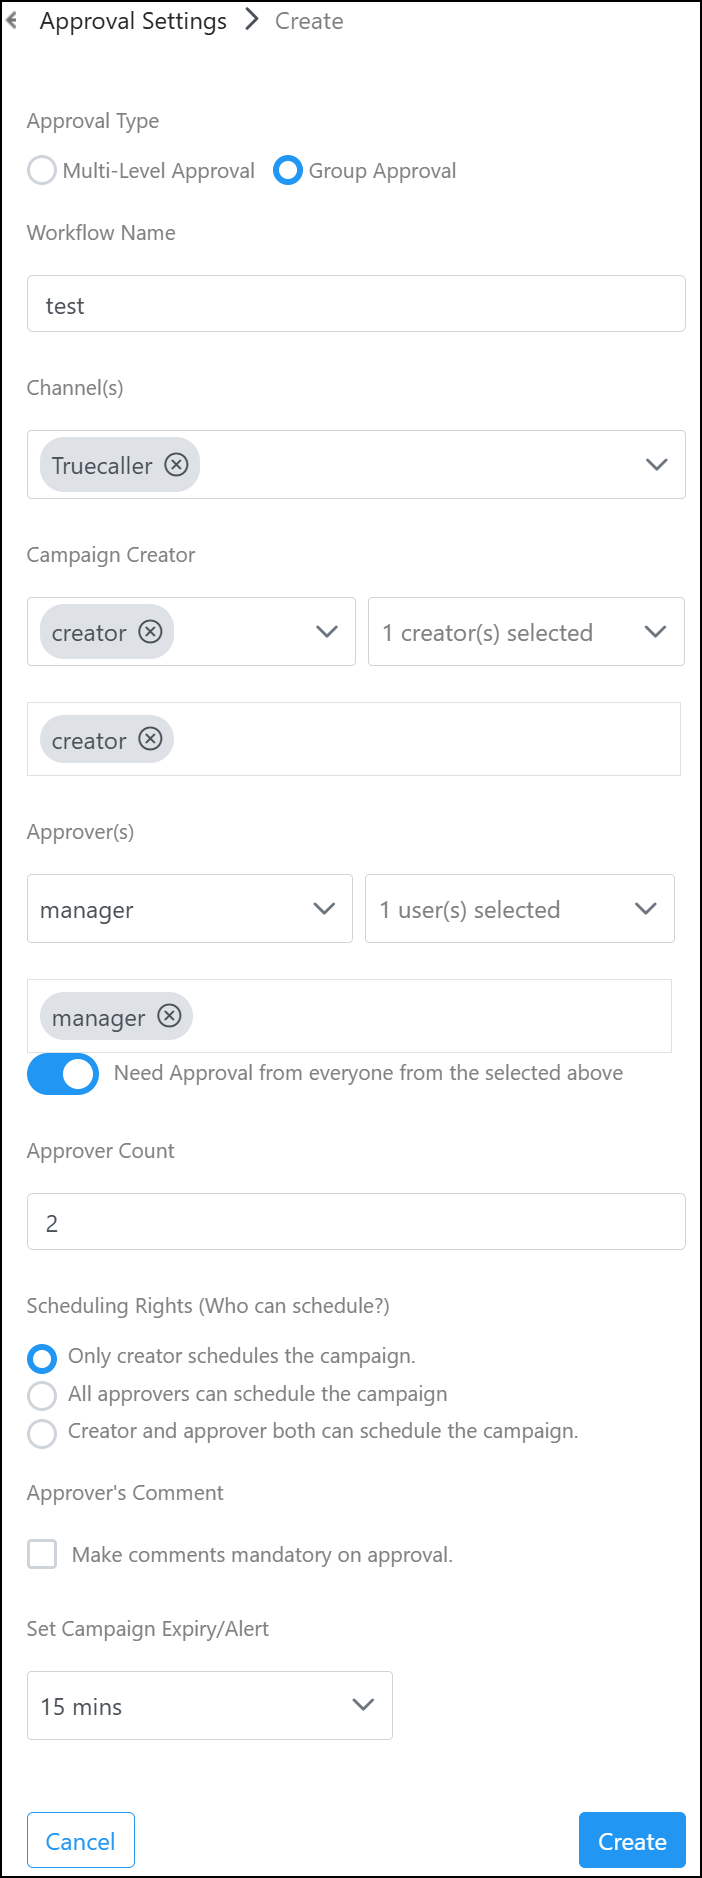
(Optional) Under Approvers Comment, checkbox next to Make comments mandatory on approval.
Under Set Campaign Expiry Alert, select an appropriate expiry time from the drop-down menu—for example, 15 mins, 30 mins, and 60 mins at which the campaign manager sends an alert to the reviewers before its expiry.
Click Create at the bottom of the screen.
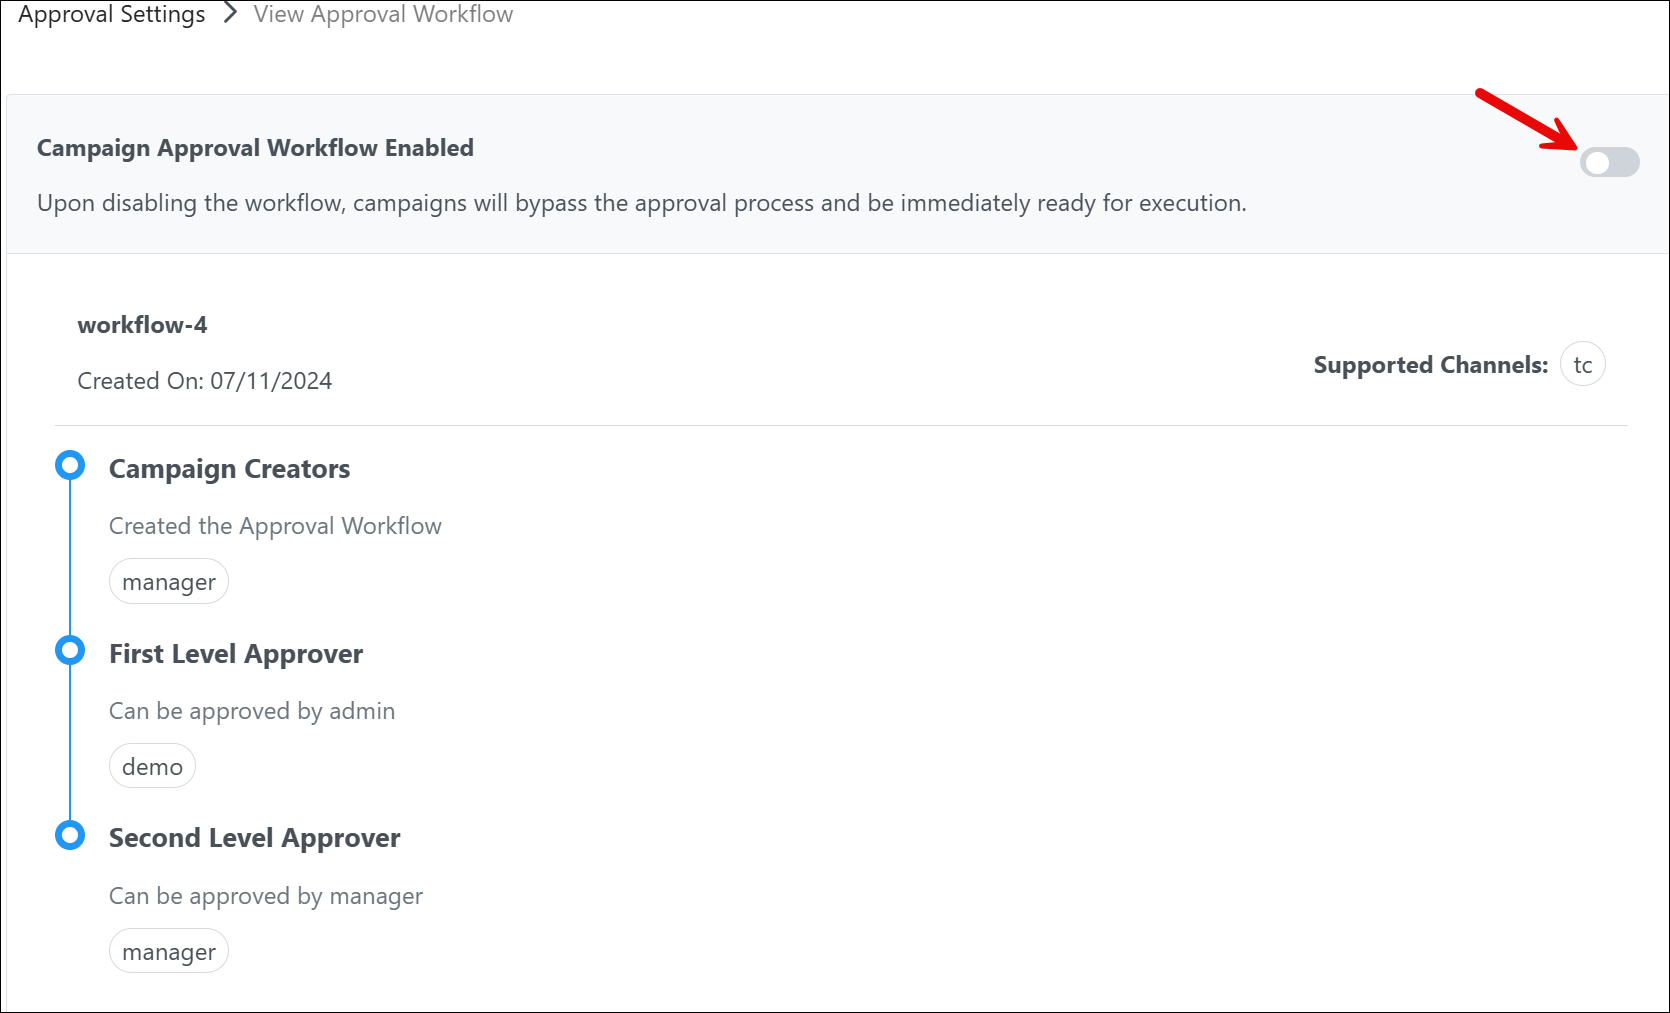
View Approval Settings
To view and bypass the approval workflow,
Navigate to Settings --> Approval Settings from the left menu.
Click the eye icon (
 ) next to the workflow that you want to view.
(Optional) Enable the toggle button to bypass the approval workflow for the campaigns that you would prefer to execute immediately.

Edit the Campaign Approval Settings
To edit the approval workflow,
Navigate to Settings --> Approval Settings from the left menu.
Click the Stencil icon (
 ) next to the approval workflow.
Modify the required details and click Update.
Enable or Disable the Campaign Approval Workflow
To enable the approval workflow,
Navigate to Settings --> Approval Settings from the left menu.
Toggle on or off to enable or disable the approval flow.