Overview
Wisely uses an authentication header mechanism with a bearer token to allow you to access and consume APIs. Each API call requires a bearer token to communicate with the platform.
You can create an access account for sending messages via
multiple channels include WhatsApp, SMS, RCS, and Truecaller
communication types include Outgoing and Conversational messages
Note
For Conversational messages, you will need to configure a webhook in the Wisely platform to receive responses from your enterprise users.
Wisely supports the following types of messages to communicate with your enterprise users:
OTP (One-Time Passwords)
Transactional
Promotional
Wisley secures data transfer for all API calls by conforming to the TLS 1.2 version and sends or receives data over HTTPS. You will need to upload a self-signed SSL certificate to secure your API calls.
Create an Access or API Account
Permissions Required:
Super Admin
To create an access account or generate API keys,
Step 1: Configure basic details
Login to the Wisely platform using a valid username and password.
Navigate to the API icon from the left menu.
Click Create New at the top right corner of the page.
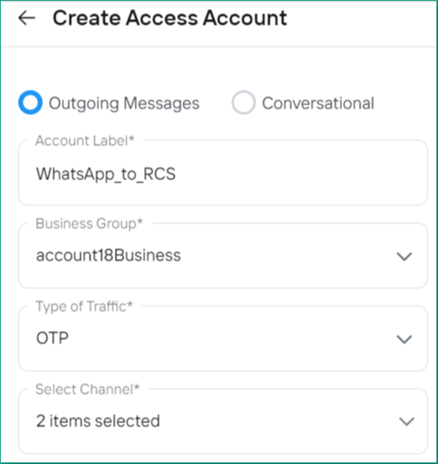
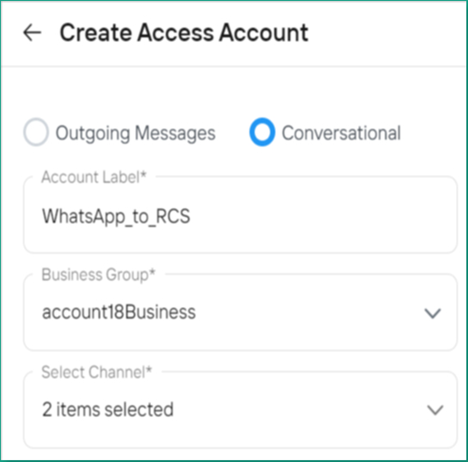
The Create Access Account form opens.Choose your desired type of communication type.
a. Outgoing Messages: allows only one-way communication
b. Conversational: allows bi-directional communicationIn the Account Label field, enter a name.
In the Business Group field, select an appropriate business group from the drop-down.
If no option is available, then you will need to create a business group. Refer to creating a business group.In the Type of traffic field, choose an option from the drop-down menu.
a. OTP
b. Transactional
c. Promotional
Note: These options apply to Outgoing messages only.In the Select Channel field, choose one or more channel(s) from the drop-down menu.
a. RCS
b. SMS
c. TrueCaller
d. WhatsApp
Step 2: Configure Advanced Settings
API & Security Settings
Set up the following parameters.
a. IP Restrictions: Choose any of the following:
Allow access from any IP: Every IP can access this account.
Restrict to the list: Add IPs that you want to restrict access to.
b. Data Protection for Message Content and Mobile Number: Choose any of the following:
Store securely: Stores your message content and mobile number on the server.
Do not Store: Do not store your message content and mobile number.
Encrypt & Store: Encrypts and stores your message content and mobile number securely.
c. Encrypt Payload: Ensures the confidentiality and integrity of data transmitted over servers to the client. Wisely supports Advanced Encryption Standard (AES) in which both sender and receiver use the same secret key to encrypt and decrypt the payload.
Choose the encryption method (AES 128 and AES256) and enter the passphrase and version code to encrypt the payload.
.png)
.png)
Channel Resources
Set Up the Following Channel Settings
Consent Management: You will need to select consent management practices. By default, "No consent needed" is applied.
Lookup explicit Opt-in: Check this box if you want to search for users who have opted in to receive messages.
Lookup explicit Opt-out: Check this box if you want to search for users who have opted out of receiving messages.
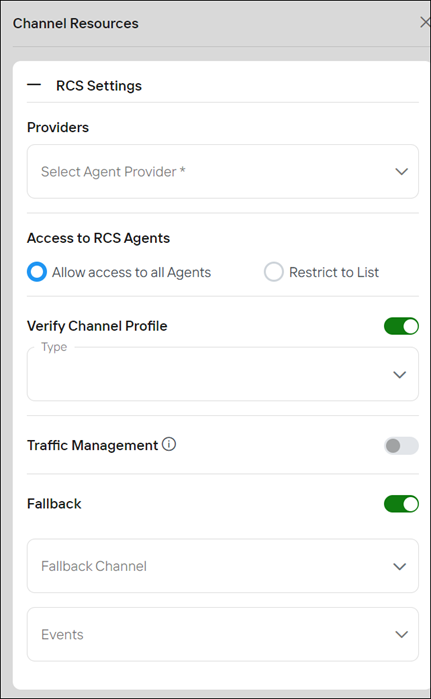
RCS Settings: These settings apply only when the RCS channel is selected. Choose the appropriate options under these settings.
Agent Providers: These include telcos like Vodafone Idea and Reliance Jio. Select one or more from the drop-down list.
Access to RCS agents: Choose any of the following options.
Allow access to all agents: Enables all agent IDs to access the account.
Restrict to List: Add a list of agent IDs you want to restrict access to this account.
Verify Channel Profile: Enable the toggle button to verify the channel profile. Choose any of the verification types below.
Strict: Sends messages if the end-user has the RCS channel.
Non-strict: Sends messages regardless of the end user’s receiving channels.
Fallback: Switch on the toggle button to enable a fallback channel.
Fallback Channel: Choose an alternate channel to route the message if the user does not receive the message sent via the RCS channel.
Events: Select the types of events for which you would like to route the message to an alternate channel. These events include:
Delivery Failed
DR TTL Expired: Enter the number of seconds to implement a fallback to the alternate channel. For example, if you enter 20 seconds, the system implements the fallback mechanism to alternate channels that you have configured.
Invalid Number
Message Validity Expired
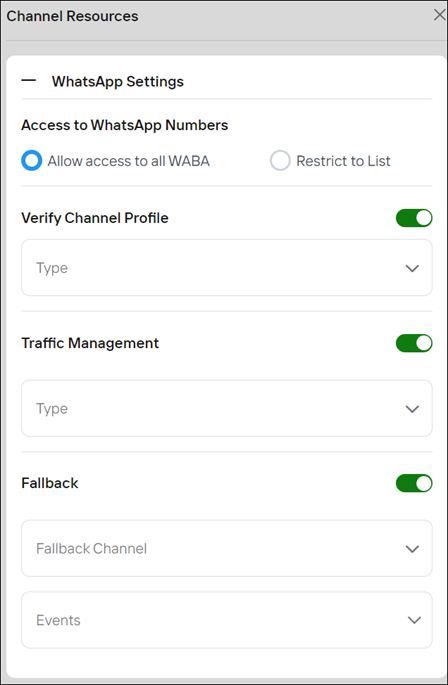
WhatsApp Settings: These are applicable only when the WhatsApp channel is selected.
Access to WABA Agents: Choose any of the following.
Allow access to all WABA: Enables all WABA numbers to access the account.
Restrict to List: Adds a list of WABA numbers that you want to restrict access to in this account.
Verify Channel Profile: Enable the toggle button to verify the channel profile. Choose any of the following verification types.
Strict: Sends messages if the end-user has the WhatsApp channel enabled on their device.
Non-strict: Sends messages regardless of the end user’s receiving channels.
Traffic Management: Enable the toggle button to balance the message payload. Choose an appropriate load balancing type from the options below.
Round Robin: A load-balancing technique that cyclically forwards client requests through a group of servers.
Capacity-Based Distribution: This technique adjusts traffic distribution in real-time based on current capacity and utilization.
Fallback: Switch on the toggle button to enable a fallback channel.
Fallback Channel: Choose an alternate channel to route the message if the user does not receive the message sent via WhatsApp channel.
Events: Select the types of events for which you would like to route the message to an alternate channel. These events include:
Delivery Failed
DR TTL Expired: Enter the number of seconds to implement a fallback to the alternate channel. For example, if you enter 20 seconds, the system implements the fallback mechanism to alternate channels you have configured.
Invalid Number
Message Validity Expired
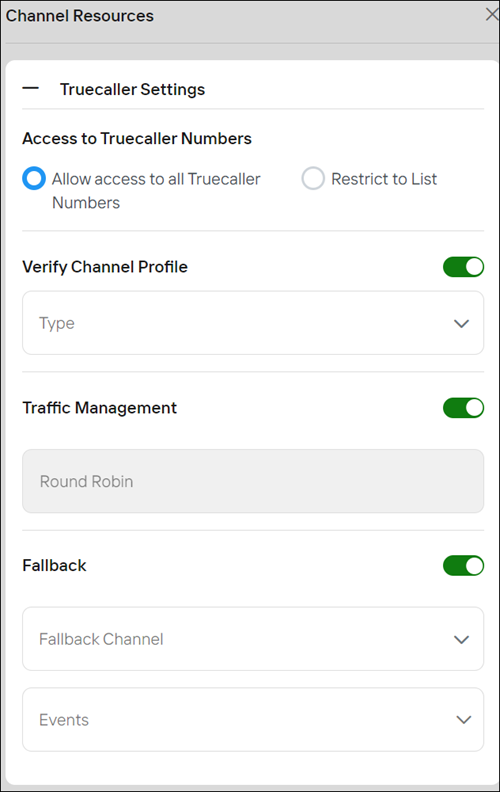
TrueCaller Settings: These are applicable only when Truecaller channel is selected.
Access to TrueCaller Numbers: Choose any of the following.
Allow access to all TrueCaller Numbers: Enables all numbers to access the account.
Restrict to List: Add a list of numbers you want to restrict access to this account.
Verify Channel Profile: Enable the toggle button to verify the channel profile. Choose any of the following verification types.
Strict: Sends messages if the end-user has the TrueCaller channel enabled on their device.
Non-strict: Sends messages regardless of the end user’s receiving channels.
Traffic Management: Enable the toggle button to balance the message payload. Choose an appropriate load balancing type from the options below.
Round Robin: A load-balancing technique that cyclically forwards client requests through a group of servers.
Fallback: Switch on the toggle button to enable an alternate channel to send a message.
Fallback Channel: Choose an alternate channel to route the message if the user does not receive the message sent via the Truecaller channel.
Events: Select the types of events for which you would like to route the message to an alternate channel. These events include:
Delivery Failed
DR TTL Expired: Enter the number of seconds to implement a fallback to the alternate channel. For example, if you enter 20 seconds, the system implements the fallback mechanism to alternate channels you have configured.
Invalid Number
Message Validity Expired
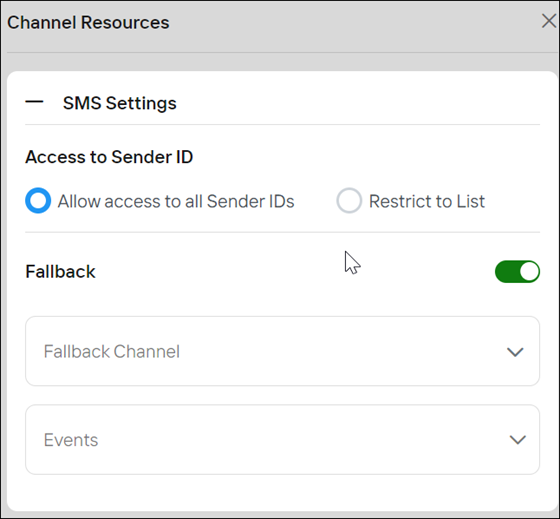
SMS Settings: These are applicable only when the SMS channel is selected
Access to Sender ID: Choose any of the following.
Allow access to all Sender IDs: Enables all sender IDs to access the account.
Restrict to List: Add a list of sender IDs that you want to restrict access to this account.
Fallback: Switch on the toggle button to enable a fallback channel.
Fallback Channel: Choose an alternate channel to route the message if the user does not receive the message sent via the SMS channel.
Events: Select the types of events for which you would like to route the message to an alternate channel. These events include:
Delivery Failed
DR TTL Expired: Enter the number of seconds to implement a fallback to the alternate channel. For example, if you enter 20 seconds, the system implements the fallback mechanism to alternate channels you have configured.
Invalid Number
Message Validity Expired
Webhook for Outgoing Status events
Switch on the toggle to enable and set up the webhook to receive notifications of the message delivery status.
a. Select the following events that you would want to receive notifications on the endpoint:
Delivery Status: Receives a notification if the message is delivered or failed.
Sent: Receives a notification when the message is sent to the end user from the platform.
Read: Receives a notification when the end user reads your message.
Typing: Receives a notification when the end user starts replying to your message. This event applies only to the Conversational type.
b. In the Payload format, select your desired format from the following menu.
Native: allows callback notifications to be received on Campaign Manager
CleverTap: allows callback notifications to be received on CleverTap
MoEngage: allows callback notifications to be received on MoEngage
WebEngage: allows callback notifications to be received on WebEngage
c. (Optional) In the Intermediate Delivery Notification, select Enable to receive an intermediate callback notification in case of a fallback from one channel to another. This option applies to Delivery Status events only.
d. Select the desired protocol through which you want to receive notifications from the following.
NATS: A high-performance messaging system that is ideal for real-time communications in distributed systems.
The webhook sample:
nats://webhook.site/81xxxxxxxx-xxxxxx-xxxxx_testHTTPS: Secures communication over the internet, ensuring data integrity and privacy.
The webhook sample:
https://webhook.site/81xxxxxxxx-xxxxxx-xxxxx_test
e. (Optional) Turn on the toggle button to enable the header that includes the metadata like key: value pairs along with the payload while sending an event to the platform.
f. Switch on the toggle to enable retries and batch notifications.
Retries: Retries enable our platform to resend any webhook notifications that failed to hand over to the webhook URL. A maximum of 3 retries are allowed.
Batch Notifications: Enable this feature to receive the status of multiple events in a single notification. A maximum of 50 events can be obtained in a single batch.
g. Encrypt Payload: Ensures the confidentiality and integrity of data transmitted to the webhook receiver. Wisely supports Advanced Encryption Standard (AES) in which both sender and receiver use the same secret key to encrypt and decrypt the payload.
Choose the encryption method (AES 128 and AES256) and enter the passphrase and version code to encrypt the payload..png)
.png)
.png)
.png)
Webhook for User-Initiated Messages
Switch on the toggle to enable and set up the webhook to receive notifications when the user responds to your message.
Note
This setting applies to the Conversation communication type only.
a. Webhook URL: Select the desired protocol through which you want to receive notifications from the following.
NATS: A high-performance messaging system that is ideal for real-time communications in distributed systems.
The webhook sample:
nats://webhook.site/81xxxxxxxx-xxxxxx-xxxxx_testHTTPS: Secures communication over the internet, ensuring data integrity and privacy.
The webhook sample:
https://webhook.site/81xxxxxxxx-xxxxxx-xxxxx_test
b. In the Payload format, select your desired format from the following menu.
Native: allows user-initiated notifications to be received on Campaign Manager
CleverTap: allows user-initiated notifications to be received on CleverTap
MoEngage: allows user-initiated notifications to be received on MoEngage
WebEngage: allows user-initiated notifications to be received on WebEngage
c. Retries: Retries enable our platform to resend any webhook notifications that failed to hand over to the webhook URL. A maximum of 3 retries are allowed.
d. (Optional) Turn on the toggle button to enable the header that includes the metadata like key: value pairs with the payload while sending an event to the platform.
e. Encryption: Ensures the confidentiality and integrity of data transmitted to the webhook receiver. Wisely supports Advanced Encryption Standard (AES) in which both sender and receiver use the same secret key to encrypt and decrypt the payload.
Choose the encryption method (AES 128 and AES256) and enter the passphrase and version code to encrypt the payload.
.png)
.png)
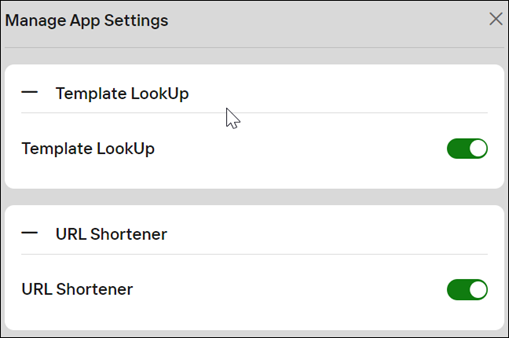
Manage App settings
Enable/disable Apps that you have subscribed to in the App module. Currently, Wisley supports the following Apps:
Template Lookup: Searches for approved templates to be included in your message.
URL Shortener: Shortens the long and unreadable URLs that are included in your message.
Step 3: Click Create.
Your access account and API key will be generated.
Permissions Required:
Super Admin
To create an access account or generate API keys,
Step 1: Configure basic details
Login to the Aggregator platform using a valid username and password.
Navigate to API icon from the left menu.
Click Create New at the top right corner of the page.
The Create Access Account form opens.Choose your desired type of communication type.
a. Outgoing Messages: allows only one-way communication
b. Conversational: allows bi-directional communicationIn the Account Label field, enter a name.
In the Business Group field, select an appropriate business group from the drop-down.
If no option is available, then you will need to create a business group. Refer to creating a business group.In the Type of traffic field, choose an option from the drop-down menu.
a. OTP
b. Transactional
c. Promotional
Note: These options apply to Outgoing messages only.In the Select Channel field, choose one or more channel(s) from the drop-down menu.
a. RCS
b. SMS
c. TrueCaller
d. WhatsApp
Step 2: Configure Advanced Settings
API & Security Settings
Set up the following parameters.
a. IP Restrictions: Choose any of the following:
Allow access from any IP: Every IP can access this account.
Restrict to the list: Add IPs that you want to restrict access to.
b. Data Protection for Message Content and Mobile Number: Choose any of the following:
Store securely: Stores your message content and mobile number on the server.
Do not Store: Do not store your message content and mobile number.
Encrypt & Store: Encrypts and stores your message content and mobile number securely.
c. Encrypt Payload: Ensures the confidentiality and integrity of data transmitted over servers to the client. Wisely supports Advanced Encryption Standard (AES) in which both sender and receiver use the same secret key to encrypt and decrypt the payload.
Choose the encryption method (AES 128 and AES256), enter the passphrase, and version code to encrypt the payload.
Resources
Set Up the Following Channel Settings
Consent Management: You will need to select consent management practices. By default, "No consent needed" is applied.
Lookup explicit Opt-in: Check this box if you want to search for users who have opted in to receive messages.
Lookup explicit Opt-out: Check this box if you want to search for users who have opted out of receiving messages.
RCS Settings: These settings apply only when the RCS channel is selected. Choose the appropriate options under these settings.
Agent Providers: These include telcos like Vodafone Idea and Reliance Jio. Select one or more from the drop-down list.
Access to RCS agents: Choose any of the following options.
Allow access to all agents: Enables all agent IDs to access the account.
Restrict to List: Add a list of agent IDs you want to restrict access to this account.
Verify Channel Profile: Enable the toggle button to verify the channel profile. Choose any of the verification types below.
Strict: Sends messages if the end-user has the RCS channel.
Non-strict: Sends messages regardless of the end user’s receiving channels.
Fallback: Switch on the toggle button to enable a fallback channel.
Fallback Channel: Choose an alternate channel to route the message if the user does not receive the message sent via the RCS channel.
Events: Select the types of events for which you would like to route the message to an alternate channel. These events include:
Delivery Failed
DR TTL Expired: Enter the number of seconds to implement a fallback to the alternate channel. For example, if you enter 20 seconds, the system implements the fallback mechanism to alternate channels that you have configured.
Invalid Number
Message Validity Expired
WhatsApp Settings: These are applicable only when the WhatsApp channel is selected.
Access to WABA Agents: Choose any of the following.
Allow access to all WABA: Enables all WABA numbers to access the account.
Restrict to List: Adds a list of WABA numbers that you want to restrict access to in this account.
Verify Channel Profile: Enable the toggle button to verify the channel profile. Choose any of the following verification types.
Strict: Sends messages if the end-user has the WhatsApp channel enabled on their device.
Non-strict: Sends messages regardless of the end user’s receiving channels.
Traffic Management: Enable the toggle button to balance the message payload. Choose an appropriate load balancing type from the options below.
Round Robin: A load-balancing technique that cyclically forwards client requests through a group of servers.
Capacity-Based Distribution: This technique adjusts traffic distribution in real time based on current capacity and utilization.
Fallback: Switch on the toggle button to enable a fallback channel.
Fallback Channel: Choose an alternate channel to route the message if the user does not receive the message sent via WhatsApp channel.
Events: Select the types of events for which you would like to route the message to an alternate channel. These events include:
Delivery Failed
DR TTL Expired: Enter the number of seconds to implement a fallback to the alternate channel. For example, if you enter 20 seconds, the system implements the fallback mechanism to alternate channels you have configured.
Invalid Number
Message Validity Expired
TrueCaller Settings: These are applicable only when the Truecaller channel is selected.
Access to TrueCaller Numbers: Choose any of the following.
Allow access to all TrueCaller Numbers: Enables all numbers to access the account.
Restrict to List: Add a list of numbers you want to restrict access to in this account.
Verify Channel Profile: Enable the toggle button to verify the channel profile. Choose any of the following verification types.
Strict: Sends messages if the end-user has the TrueCaller channel enabled on their device.
Non-strict: Sends messages regardless of the end user’s receiving channels.
Traffic Management: Enable the toggle button to balance the message payload. Choose an appropriate load balancing type from the options below.
Round Robin: A load-balancing technique that cyclically forwards client requests through a group of servers.
Fallback: Switch on the toggle button to enable an alternate channel to send a message.
Fallback Channel: Choose an alternate channel to route the message if the user does not receive the message sent via the TrueCaller channel.
Events: Select the types of events for which you would like to route the message to an alternate channel. These events include:
Delivery Failed
DR TTL Expired: Enter the number of seconds to implement a fallback to the alternate channel. For example, if you enter 20 seconds, the system implements the fallback mechanism to alternate channels you have configured.
Invalid Number
Message Validity Expired
SMS Settings: These are applicable only when the SMS channel is selected
Access to Sender ID: Choose any of the following.
Allow access to all Sender IDs: Enables all sender IDs to access the account.
Restrict to List: Add a list of sender IDs that you want to restrict access to this account.
Fallback: Switch on the toggle button to enable a fallback channel.
Fallback Channel: Choose an alternate channel to route the message if the user does not receive the message sent via the SMS channel.
Events: Select the types of events for which you would like to route the message to an alternate channel. These events include:
Delivery Failed
DR TTL Expired: Enter the number of seconds to implement a fallback to the alternate channel. For example, if you enter 20 seconds, the system implements the fallback mechanism to alternate channels you have configured.
Invalid Number
Message Validity Expired
Webhook for Outgoing Status events
Switch on the toggle to enable and set up the webhook to receive notifications of the message delivery status.
a. Select the following events that you would want to receive notifications on the endpoint:
Delivery Status: Receives a notification if the message is delivered or failed.
Sent: Receives a notification when the message is sent to the end user from the platform.
Read: Receives a notification when the end user reads your message.
Typing: Receives a notification when the end user starts replying to your message. This event applies only to the Conversational type.
b. In the Payload format, select your desired format from the following menu.
Native: allows callback notifications to be received on Campaign Manager
CleverTap: allows callback notifications to be received on CleverTap
MoEngage: allows callback notifications to be received on MoEngage
WebEngage: allows callback notifications to be received on WebEngage
c. (Optional) In the Intermediate Delivery Notification, select Enable to receive an intermediate callback notification in case of a fallback from one channel to another. This option applies to Delivery Status events only.
d. Select the desired protocol through which you want to receive notifications from the following.
NATS: A high-performance messaging system that is ideal for real-time communications in distributed systems.
The webhook sample:
nats://webhook.site/81xxxxxxxx-xxxxxx-xxxxx_testHTTPS: Secures communication over the internet, ensuring data integrity and privacy.
The webhook sample:
https://webhook.site/81xxxxxxxx-xxxxxx-xxxxx_test
e. (Optional) Turn on the toggle button to enable the header that includes the metadata like key: value pairs along with the payload while sending an event to the platform.
f. Switch on the toggle to enable retries and batch notifications.
Retries: Retries enable our platform to resend any webhook notifications that failed to hand over to the webhook URL. A maximum of 3 retries are allowed.
Batch Notifications: Enable this feature to receive multiple events’ status in a single notification. A maximum of 50 events can be received in a single batch.
g. Encrypt Payload: Ensures the confidentiality and integrity of data transmitted to the webhook receiver. Wisely supports Advanced Encryption Standard (AES) in which both sender and receiver use the same secret key to encrypt and decrypt the payload.
Choose the encryption method (AES 128 and AES256) and enter the passphrase and version code to encrypt the payload.
Webhook for User-Initiated Messages
Switch on the toggle to enable and set up the webhook to receive notifications when the user responds to your message.
Note
This setting applies to the Conversation communication type only.
a. Webhook URL: Select the desired protocol through which you want to receive notifications from the following.
NATS: A high-performance messaging system that is ideal for real-time communications in distributed systems.
The webhook sample:
nats://webhook.site/81xxxxxxxx-xxxxxx-xxxxx_testHTTPS: Secures communication over the internet, ensuring data integrity and privacy.
The webhook sample:
https://webhook.site/81xxxxxxxx-xxxxxx-xxxxx_test
b. In the Payload format, select your desired format from the following menu.
Native: allows user-initiated notifications to be received on Campaign Manager
CleverTap: allows user-initiated notifications to be received on CleverTap
MoEngage: allows user-initiated notifications to be received on MoEngage
WebEngage: allows user-initiated notifications to be received on WebEngage
c. Retries: Retries enable our platform to resend any webhook notifications that failed to hand over to the webhook URL. A maximum of 3 retries are allowed.
d. (Optional) Turn on the toggle button to enable the header that includes the metadata like key: value pairs with the payload while sending an event to the platform.
e. Encrypt Payload: Ensures the confidentiality and integrity of data transmitted to the webhook receiver. Wisely supports Advanced Encryption Standard (AES) in which both sender and receiver use the same secret key to encrypt and decrypt the payload.
Choose the encryption method (AES 128 and AES256) and enter the passphrase and version code to encrypt the payload.
.png)
.png)
Manage App settings
Enable/disable Apps that you have subscribed to in the App module. Currently, Wisley supports the following Apps:
Template Lookup: Searches for approved templates to be included in your message.
URL Shortener: Shortens the long and unreadable URLs that are included in your message.
Step 3: Click Create.
Your access account and API key will be generated.
View an API Key
Wisely provides an interactive UI to view the API key generated for each access account that is created for your enterprise users.
To view the API key,
Login to the Wisely account with your valid credentials.
Navigate to the API icon from the left menu.
The Access account page opens.Click the key icon next right to your access account.
Your API key is displayed on the screen.Copy and paste in your API header.
Aggregator provides an interactive UI to view the API key generated for each access account that is created for your enterprise users.
To view the API key,
Login to the Aggregator platform with your valid credentials.
Navigate to the API icon from the left menu.
The Access account page opens.Click the key icon next right to your access account.
Your API key is displayed on the screen.Copy and paste in your API header.
Generate a New API Key
Wisely enables you to regenerate a new API key if your existing access account API key is lost or stolen.
To generate a new API key,
Login to the Wisely account with your valid credentials.
Navigate to the API icon from the left menu.
The Access account page opens.Click the key icon next right to your access account.
Your API key is displayed on the screen.Click Generate New API Key.
Your existing API key will be refreshed, and a new one will be generated.
The Aggregator enables you to regenerate a new API key if your existing access account API key is lost or stolen.
To generate a new API key,
Login to the Aggregator with your valid credentials.
Navigate to API icon from the left menu.
The Access account page opens.Click the key icon next right to your access account.
Your API key is displayed on the screen.Click Generate New API Key.
Your existing API key will be refreshed, and a new one will be generated.
View an Access Account
You have created your access account and would like to explore the details of it.
To explore your access account details,
Login to the Wisely account with your valid credentials.
Navigate to the API icon from the left menu.
The Access account page opens.Click the eye icon (
.png) ) next to the access account that you would prefer to explore.
) next to the access account that you would prefer to explore.
A side menu opens on the right of the screen.
You have created your access account and would like to explore the details of it.
To explore your access account details,
Login to the Aggregator with your valid credentials.
Navigate to the API icon from the left menu.
The Access account page opens.Click the eye icon next to the access account that you would prefer to explore.
A side menu opens on the right of the screen.
Edit an Access Account
To edit your access account,
Login to the Wisely account with your valid credentials.
Navigate to the API icon from the left menu.
The Access account page opens.Click the stencil icon (
.png) ) next to the access account that you would prefer to modify.
) next to the access account that you would prefer to modify.
The access account form opens in the edit mode.Modify your basic details and advanced settings in the form.
Click Update.
Your recent details will be updated.
To edit your access account,
Login to the Aggregator with your valid credentials.
Navigate to the API icon from the left menu.
The Access account page opens.Click the stencil icon (
) next to the access account that you would prefer to modify.
The access account form opens in the edit mode.Modify your basic details and advanced settings in the form.
Click Update.
Your recent details will be updated.
Disable an Access account
You can disable your access account if no longer required.
To disable an access account,
Login to the Wisely account with your valid credentials.
Navigate to the API icon from the left menu.
The Access account page opens.Turn off the toggle switch to disable your access account.
A popup appears on the screen.Click Yes.
Your access account will be disabled and moved to the inactive state.

You can disable your access account if no longer required.
To disable an access account,
Login to the Aggregator with your valid credentials.
Navigate to API icon from the left menu.
The Access account page opens.Turn off toggle switch to disable your access account.
A popup appears on the screen.Click Yes.
Your access account will be disabled and moved to the inactive state.
Re-enable the Disabled Access Account
You have disabled your/someone’s access account and would like to re-enable it again.
To re-enable an access account,
Login to the Wisely account with your valid credentials.
Navigate to the API icon from the left menu.
The Access account page opens.Click the box next to Status and select Inactive from the drop-down menu.
All inactive access accounts appear here.Turn on the toggle switch next to your access account that would prefer to enable.
Your access account will be moved to active status.

You have disabled your/someone’s access account and would like to re-enable it again.
To re-enable an access account,
Login to the Aggregator with your valid credentials.
Navigate to API icon from the left menu.
The Access account page opens.Click the box next to Status and select Inactive from the drop-down menu.
All inactive access accounts appear here.Turn on the toggle switch next to your access account that would prefer to enable.
Your access account will be moved to active status.
View and Download Webhook Log
Wisely records the delivery events of outgoing messages and user-initiated messages as logs in the webhook log page including the type of event (read and sent), handover status to webhook URL (Failed or Success), and number of retries that you have set during the access account creation.
To view and download the webhook log,
Login to the Wisely account with your valid credentials.
Navigate to the API icon from the left menu.
The Access account page opens.Click the ellipsis icon (...) and then click Webhook log.
The webhook log page opens.Click Download at the top right corner.
The entries in the webhook log will be downloaded as a CSV file.

The Aggregator records the delivery events of outgoing messages and user-initiated messages as logs in the webhook log page including the type of event (read, and sent), handover status to webhook URL (Failed or Success), and number of retries that you have set during the access account creation.
To view and download the webhook log,
Login to the Aggregator with your valid credentials.
Navigate to the API icon from the left menu.
The Access account page opens.Click the ellipsis icon (...) and then click Webhook log.
The webhook log page opens.Click Download at the top right corner.
The entries in the webhook log will be downloaded as a CSV file.