This module deals with inviting users to the Wisely platform, assigning roles to multiple users, and creating business groups by adding users from the same or different departments within the enterprise.
Invite or Add Users
No communication platform operates in isolation—and Wisely is no exception. To unlock its full potential and meet its operational requirements, you need to add or invite other users.
Authorized Users:
Super Admin, and Admin
To invite or add users,
Login to the Wisely platform using a valid username and password.
Click Settings on the left menu.
Under the Identity & Access module, click Users.
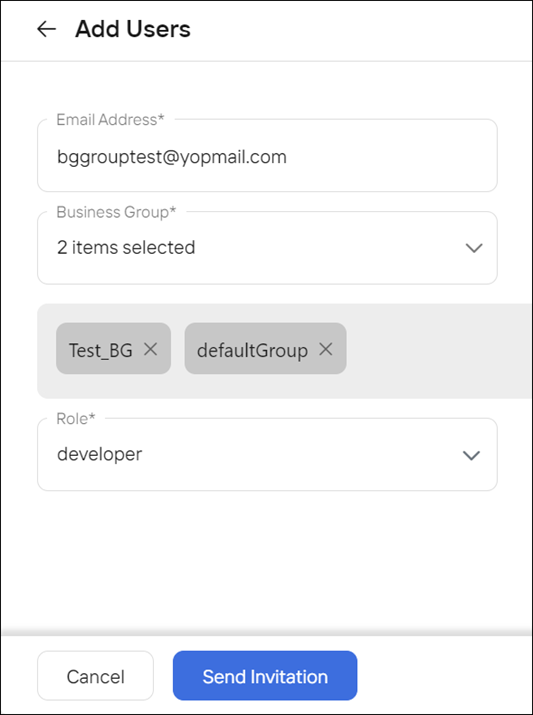
The user’s home page opens.Click Add User at the top right corner.
In the Email Address field, enter the user’s email id that you would prefer to invite.
In the Business Group field, assign an appropriate business group(s) to the user. By default, assign defaultGroup, if no business group is available in your account. Refer to this article to learn more about Business groups.
In the Role field, assign the appropriate role from the drop-down menu.
Click Send Invitation.
An invitation will be sent to your enterprise user. Once the user gets logged into the platform, the account will be activated.Note
If the user does not activate the account, then the account status will be in Pending activation.
Authorized Users:
Super Admin, and Admin
To invite or add users,
Login to the Aggregator platform using a valid username and password.
Click Settings on the left menu.
Under the Users & Permissions module, click Users.
The user’s home page opens.Click Add User at the top right corner.
The Add user form opens.In the Username field, enter the name of a user.
In the Email Address field, enter the user’s email id that you would prefer to invite.
In the Business Group field, assign an appropriate business group(s) to the user. See more on how to add business groups.
(Optional) In the Designation field, enter the appropriate designation of a user.
(Optional) In the Country field, select the appropriate country that the user belongs to.
(Optional) In the Number field, enter the phone number of a user.
Under the Roles & Permissions, in the Assigned Enterprises field, select one or more enterprises that you want add from the dropdown menu. The user can access the assigned enterprises to create entities and submit message traffic.
In the Role field, assign the appropriate role from the drop-down menu. The roles include:
Admin
PMO
Developer
CSM
Sales
See more details on Aggregator - RBAC
Click Send Invitation.
An invitation will be sent to your enterprise user. Once the user gets logged into the platform, the account will be activated.If the user does not activate the account, then the account status will be in “Pending activation.”
.png)
Resend Activation Mail
When your enterprise user does not activate the Wisely account, the status is shown as a Pending invitation next to that user in the Users’ home page. Wisely enables you to resend the invitation to your enterprise user to log in to the platform, if the previous activation email expires.
Note
This feature is applicable to users who have not activated their accounts during the first-time invitation.
To resend the activation mail,
Login to the Wisely platform using a valid username and password.
Click Settings on the left menu.
Under the Identity & Access module, click Users.
The users’ home page opens.In the Status filter, select Pending Activation from the drop-down list.
All users with pending activation status appear on the page.Click the ellipses icon (…) on the far right of the user.
Click Resend Activation Mail from the drop-down menu.
The activation mail will be sent to your enterprise user to activate the account.
To resend the activation mail,
Login to the Aggregator platform using a valid username and password.
Click Settings on the left menu.
Under the Users & Permissions module, click Users.
The user’s home page opens.In the Status filter, select Pending Activation from the drop-down list.
All users with pending activation status appear on the page.Click the ellipses icon (…) on the far right of the user.
Click Resend Activation Mail from the drop-down menu.
The activation mail will be sent to your enterprise user to activate the account.
.png)
View User(s) information
You created a user in your enterprise user account, and you would like to explore the details of that user account including permissions, business groups, email address, created date updated date etc.
To explore user accounts,
Login to the Wisely platform using a valid username and password.
Click Settings on the left menu.
Under the Identity & Access module, click Users.
The user’s home page opens.Click the eye icon (
.png) ) on the far right to the user account.
) on the far right to the user account.
A side menu appears on the right of your screen.Scroll down till the end to view details and close it.

To explore user accounts,
Login to the Aggregator platform using a valid username and password.
Click Settings on the left menu.
Under the Users & Permissions module, click Users.
The user’s home page opens.Click the eye icon (
) on the far right to the user account.
A side menu appears on the right of your screen.Scroll down till the end to view details and close it.
.png)
Edit User(s) Information
Wisely allows you to edit or modify the details of your enterprise account user including email address, business groups, and role. You can edit the user details only when it is in the status, such as “Active, Pending Activation, and Suspended.”
To edit or modify your user information,
Login to the Wisely platform using a valid username and password.
Click Settings on the left menu.
Under the Identity & Access module, click Users.
The users home page opens.Click the stencil icon (
.png) ) on the far right of the user account.
) on the far right of the user account.
The edit user form opens.Modify the details wherever required.
Click Update.
Your user’s details will be updated, and a mail will be sent to the user’s registered email address.

To edit or modify your user information,
Login to the Aggregator platform using a valid username and password.
Click Settings on the left menu.
Under the Users & Permissions module, click Users.
The user’s home page opens.Click the stencil icon (
) on the far right of the user account.
The edit user form opens.Modify the details wherever required.
Click Update.
Your user’s details will be updated, and a mail will be sent to the user’s registered email address.
.png)
Suspend a User
You can suspend a user temporarily, when the user account is compromised or shows unusual activity, policy violations, inactive for long time, or other potential reasons.
To suspend a user,
Login to the Wisely platform using a valid username and password.
Click Settings on the left menu.
Under the Identity & Access module, click Users.
The users home page opens.Select the ellipsis icon (…) next to the user that you would prefer to suspend a user account.
Click Suspend from the dropdown menu.
A message will be sent to the user stating that “your account has been suspended temporarily”. However, you can reactivate the same user account again or delete it permanently if no longer required.
.png)
To suspend a user,
Login to the Aggregator platform using a valid username and password.
Click Settings on the left menu.
Under the Users & Permissions module, click Users.
The user’s home page opens.Select the ellipsis icon (…) next to the user that you would prefer to suspend a user account.
Click Suspend from the dropdown menu.
A message will be sent to the user stating that “your account has been suspended temporarily”. However, you can reactivate the same user account again or delete it permanently if no longer required.
.png)
Reset Password
Wisely allows you to reset the password(s) of your enterprise users, if they are not able to login for any reason. Once you reset the password, the enterprise users will receive a temporary password via email to login to the Wisely platform.
To reset a password,
Login to the Wisely platform using a valid username and password.
Click Settings on the left menu.
Under the Identity & Access module, click Users.
The users home page opens.Select the ellipsis icon (…) next to the user that you would prefer to reset a password.
Click reset password from the dropdown menu.
A message will be sent to the user with a temporary password.
.png)
To reset the password,
Login to the Aggregator platform using a valid username and password.
Click Settings on the left menu.
Under the Users & Permissions module, click Users.
The user’s home page opens.Select the ellipsis icon (…) next to the user that you would prefer to reset a password.
Click Reset Password from the dropdown menu.
A message will be sent to the user with a temporary password.
.png)