Campaign Manager supports RCS campaigns that enable enterprises to send messages quickly and receive replies from users. RCS campaigns allow adding interactive media like images and videos to promote business effectively using multiple carriers.
Key Benefits of the RCS Campaign
No API Calls: Launch campaigns to multiple users simultaneously via the Campaign Manager interface.
Preview of a Campaign: See a preview of your campaign template before launch.
Flexible Contact Selection: Choose contacts from three options: uploading a file, selecting stored contacts from previous campaigns, or pasting new contacts line-by-line.
Template Usage: Use existing templates associated with each sender number or create a new template directly in Campaign Manager.
Quick Launch: Launch campaigns to a large audience with a single click.
Flexible Scheduling: Run a campaign immediately or schedule it for a later time.
Launch an RCS Campaign
Prerequisites
Before launching an RCS campaign, ensure you have the following:
RCS Technology Provider Approval: Register with an RCS technology provider and complete verification to enable RCS communications.
Mobile Network Operators: Some countries may require additional verification with mobile network operators.
Brand Validation and Sender Number: Each brand and sender must be validated per carrier-specific rules and Google/local laws.
Target Users List: Define the list of intended users for the campaign.
Campaign Objective: Define the campaign goal, such as promotional or marketing messages.
Permissions Required
Admin
To create an RCS Campaign,
Step 1: Adding Contact Details
Navigate to Campaigns from the left menu.
Click Create Campaign at the middle right of the screen to open the campaign configuration page.
Enter a Campaign Name.
Select your desired channel for launching the campaign:
SMS
WhatsApp
Truecaller
RCS
Select the Mode of Baseline from the following options:
Insights
Lookalike
Custom Cohorts
Broadcasts: Allows you to add the target audience to the campaign.
Note
Fields will change based on the selected baseline mode.
Broadcasts
Use one of the following options to select contacts:
I. Upload File: Upload a file in XLSX, XLS, CSV, or Text format. A progress bar will appear at the top of the page.
a. Upload Type:
Mobile Numbers: Only mobile numbers are added.
Numbers and Content: Adds mobile numbers with message content.
Numbers and Variable: Adds numbers with additional columns for personalized message content.
b. Enable Reachability Check (Optional): Excludes DND numbers from the target audience across all channels if enabled.
c. Click Browse File and select a file from your local drive.
d. Click Open to upload the file.
II. Stored Contacts: Use contacts from previous campaigns. To use stored contacts, select a list from the dropdown under the Contact List field.

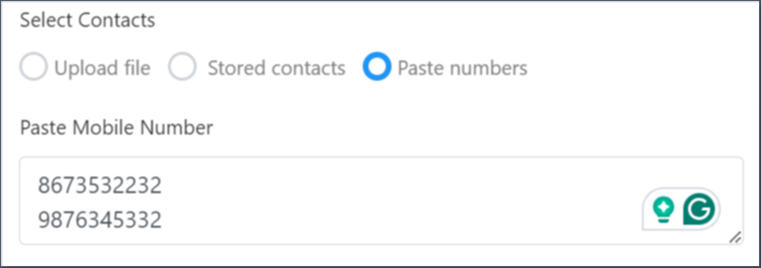
III. Paste Numbers: allows you to add number by number in a row.
IV. (Optional) Checkbox next to remove duplicates: This allows you to consider only unique mobile numbers to receive a campaign message.
V. (Optional) Toggle on the Exclusion list: This enables you to select the list of numbers that you want to exclude from receiving the campaign messages. You can select the files that were added in the previous campaigns.
Click Save and Next to move to the next section or Save as Draft to come back later.
.png)
Step 2: Adding Content
Refer to this article for more details on with or without fallback channels.
Step 3: Preview
A. Without Fallback Channels
Preview your campaign details that you have entered in step 1 & 2, and Run or Schedule your campaign.
.png)
B. With Fallback Channels
See the preview of your message content you entered in the steps 1 & 2.
Under each channel preview, enter a mobile number and click Test.
(or)
(Optional) Checkbox next to the Use same mobile number for all channels.
Once your message delivered to the target mobile number, you can run or schedule your campaign.
.png)
Step 4: Run/Schedule
Run: Starts the campaign immediately.
Schedule: This option allows you to schedule your campaign at a fixed date and time, and daily or weekly at a specific time recurrently in 4 different time zones.
To schedule your campaign,
Click Schedule at the bottom of the preview page.
Select your desired option from the following.
a. Fixed: Runs the campaign at a defined date and time. The campaign runs only once.
b. Recurring: Runs the campaign daily or weekly at a specified time.Select the Time Zone from the drop-down menu.
Select Date and Time, then Add to list.
(or)
Select Recurrent Notification as daily or weekly and time.Click Schedule and Save.
.png)

Edit a Campaign
You can edit a campaign that is in “Not Started”, and “Completed” status only.
To edit an RCS campaign,
Navigate to Campaigns from the left menu.
The Campaign listing page opens.Click the ellipsis icon (...) next to the campaign.
Click Edit from the drop-down.
The edit campaign page opens.Change your required details from basic details to the Run/Schedule page.
.png)
Clone a Campaign
Cloning allows you to create the same copy of the existing campaign and you can schedule it at different times for various audiences. You can clone a campaign that is in any status including “Not Started”, “In Progress”, and “Completed”.
To clone an RCS campaign,
Navigate to Campaigns from the left menu.
The Campaign listing page opens.Click the ellipsis icon (...) next to the campaign.
Click Clone from the drop-down menu.
A copy of the existing campaign will be created.
.png)
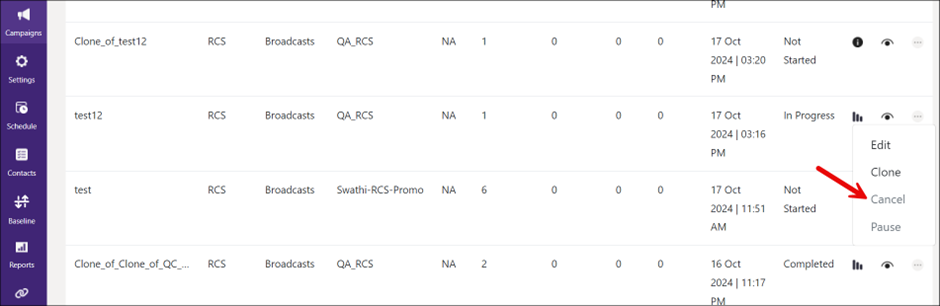
Cancel a Campaign
You can cancel an ongoing campaign if there are errors in the message content or missing the intended audience. This feature is enabled for campaigns that are in “in progress” state only.
To cancel an ongoing RCS campaign,
Navigate to Campaigns from the left menu.
The Campaign listing page opens.Click the ellipsis icon (...) next to the campaign.
Select Cancel from the drop-down menu.
The ongoing campaign will be halted.
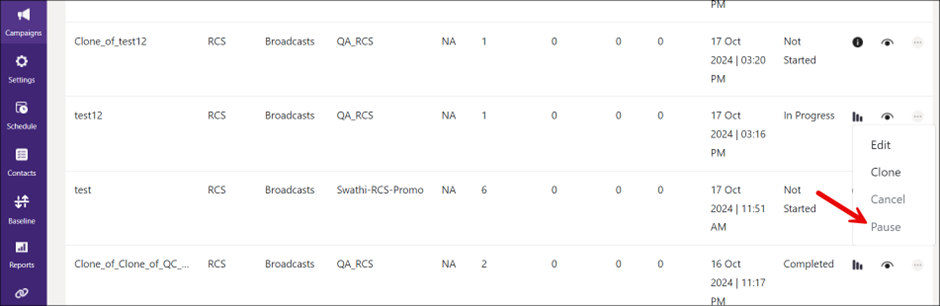
Pause a Campaign
You can pause an ongoing campaign temporarily. This feature is enabled for campaigns that are in “in progress” state only.
To pause an ongoing RCS campaign,
Navigate to Campaigns from the left menu.
The Campaign listing page opens.Click the ellipsis icon (...) next to the campaign.
Select Pause from the drop-down menu.
The ongoing campaign will be paused temporarily.
View a Campaign
You can view the RCS campaign details using Campaign Manager UI.
To view an RCS campaign,
Navigate to Campaigns from the left menu.
The Campaign listing page opens.Click the eye icon (
.png) ) next to the campaign that you would like to explore.
) next to the campaign that you would like to explore.
The campaign preview opens.

View the Performance Report
The campaign manager facilitates you to view the performance report of a campaign that you launched recently. The report consists of multiple metrics, such as total records processed, total messages delivered, total number of clicks, and cost per click etc. For more information, refer to Reports. You can view performance reports for the campaigns that are in “Completed” and “In Progress” states only.
To view the campaign reports,
Navigate to Campaigns from the left menu.
The Campaign listing page opens.Click the signal icon (
.png) ) next to the campaign that you would like to view the report.
) next to the campaign that you would like to view the report.
The campaign performance report opens.
.png)